A screenshot is the fastest way to keep something you see on your iPhone 15. You can save a recipe, a receipt, a chat, a map, or a whole web page in a second. Most people only use the basic capture, and then they never touch the editing tools that appear right after it.
This guide takes you further. You will learn the quick button capture, how to take a full-page screenshot in Safari, and how to edit, crop, mark up, and share your captures like a pro. You will also learn how to save screenshots to Files and find them again in the Photos app.
Everything here uses only the built-in tools on your iPhone 15. No extra app, no download, and no paid tool is needed. If you are new to screenshots, start with Method 1. If you already know the basics, jump straight to Method 2 for full-page captures.
Before You Start
Open the screen you want to capture before you press anything. If it is a web page, load it fully in Safari and scroll to the top first. A full-page screenshot captures the whole page from top to bottom, so starting at the top keeps the result tidy.
Check your screen brightness if the page looks dim, and close anything private that you do not want in the picture. A screenshot records exactly what is on the screen, including notifications that pop up at the wrong moment. Turn on Do Not Disturb from Control Centre if you are capturing something for work or for sharing online.
Make sure you have some free storage. Screenshots are small, but a phone that is completely full cannot save new ones. If you have just set up your phone, our step-by-step guide to setting up iPhone 15 will help you get the basics right first.
- Open the page, photo, or chat you want to capture.
- Scroll to the top of the page for a full-page capture.
- Hide private notifications with Do Not Disturb.
- Check that your iPhone 15 has free storage space.
Method 1: Capture a Screenshot with the Buttons (Quick Recap)
The button method is the foundation for everything in this guide. Press the Side button and the Volume Up button at the same time, then release them quickly. Your screen will flash white, and a small thumbnail of the screenshot will appear in the bottom-left corner.
Do not hold the buttons down. Holding them too long opens the power-off screen or Siri instead of taking a screenshot. A quick, firm press of both buttons together is all it takes. If you miss, try again with a faster press.
When the thumbnail appears, you have two choices. Tap it to open the editing screen straight away, which is where Methods 2 and 3 happen. Or swipe it to the left to dismiss it, and the screenshot saves itself to the Photos app automatically.
There are other ways to capture the screen if the buttons are hard for you to press together. You can ask Siri by saying “Hey Siri, take a screenshot.” You can also set up Back Tap in Settings, under Accessibility, then Touch, then Back Tap, and assign Screenshot to a double tap or triple tap on the back of the phone. For a full walkthrough of every capture method, see our step-by-step screenshot guide for iPhone 15.
- Open the screen you want to capture.
- Press the Side button and the Volume Up button together, then release quickly.
- Tap the thumbnail in the bottom-left corner to edit, or swipe it left to dismiss it.
- Find the saved screenshot in the Photos app.
Method 2: Take a Full-Page Screenshot in Safari
A normal screenshot only captures what is visible on your screen right now. A full-page screenshot captures the entire web page, from the top to the very bottom, in one long image. This is perfect for saving long articles, guides, receipts, recipes, and terms and conditions pages.
Full-page screenshots work in Safari, and in some other apps that show long scrollable content. They do not work on every screen on your phone. If the Full Page option does not appear, the app you are using does not support it, and you will need to take several normal screenshots instead.
Before you start, tidy up Safari. Extra tabs do not appear in the screenshot, but closing tabs you no longer need makes the browser faster and stops you from capturing the wrong page. See our quick guide to closing all tabs on iPhone 15 if your Safari is full of old pages.
- Open Safari and load the web page you want to save.
- Scroll back to the top of the page.
- Press the Side button and the Volume Up button together, then release quickly.
- Tap the thumbnail in the bottom-left corner before it disappears.
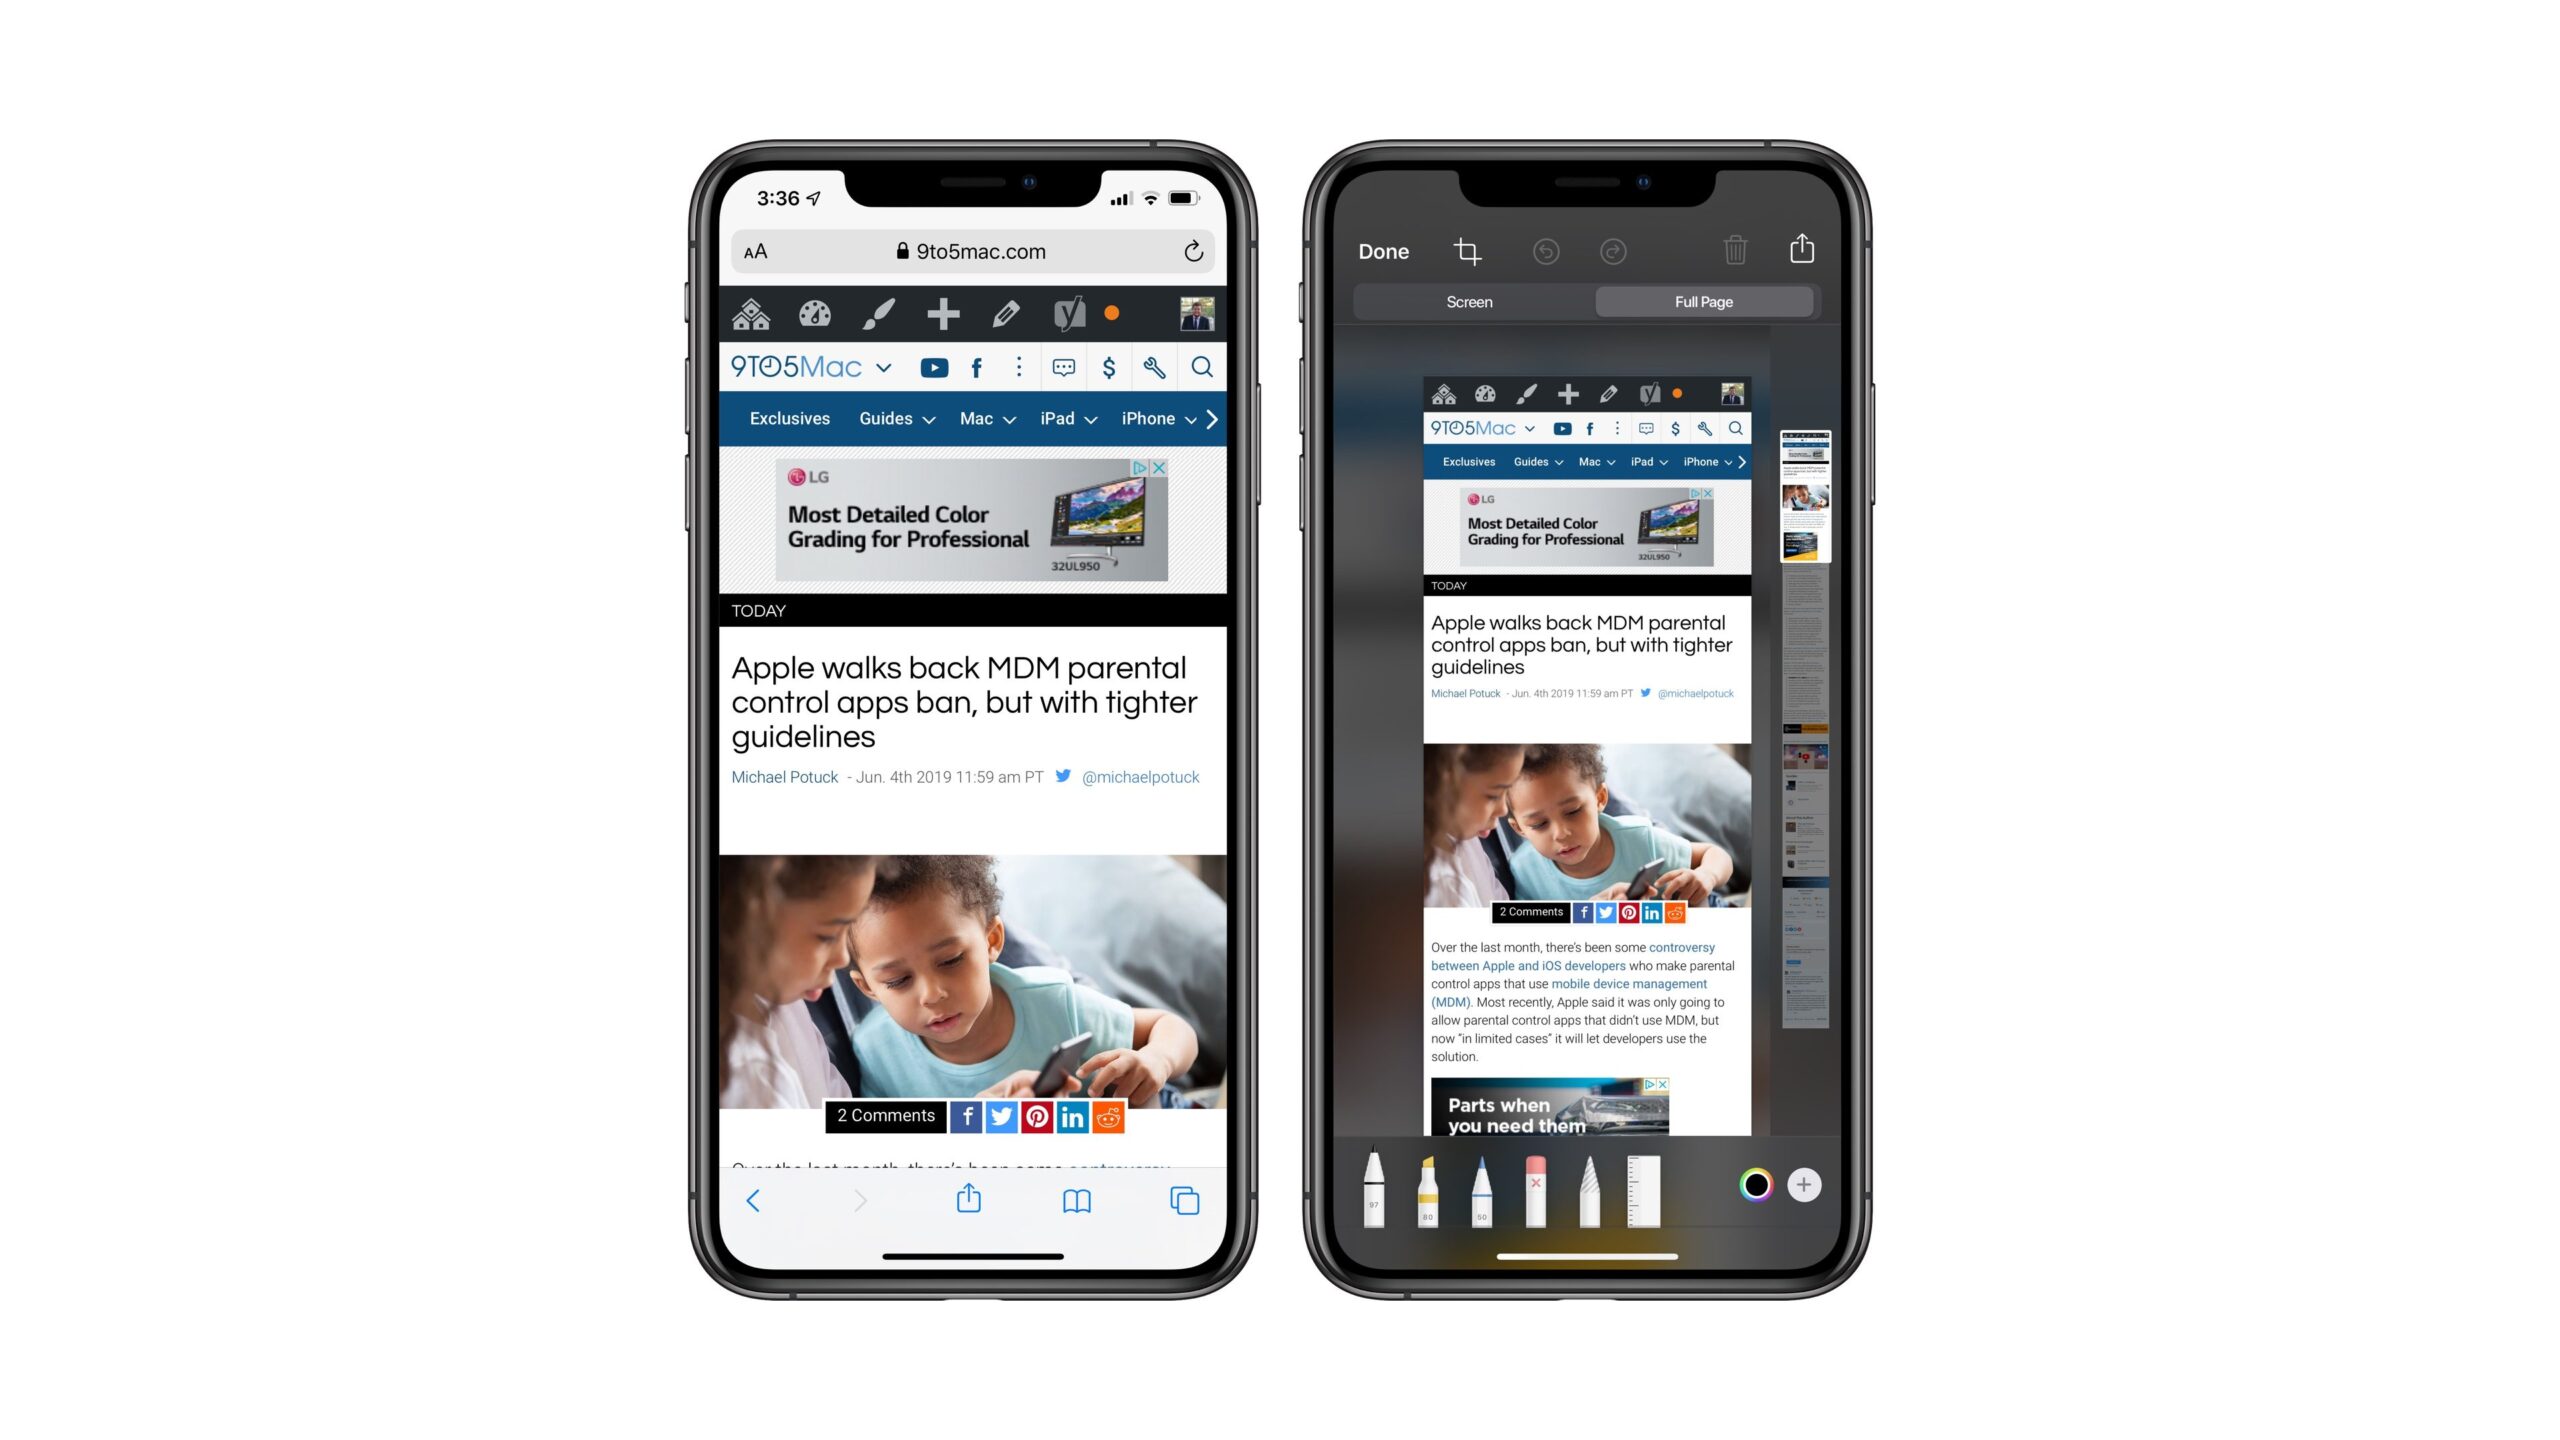
- At the top of the editing screen, tap Full Page next to Screen.
- A long preview of the whole page appears, with a small strip of page sections on the right edge. Drag through it to check the full capture.
- Tap Done in the top-left corner.
- Choose Save PDF to Files, pick a folder, and tap Save.
Your full-page screenshot is saved as a PDF, not as a photo. That is because a very long image would be huge as a photo file, while a PDF keeps the text sharp and the file small. You can open it later in the Files app, share it, print it, or send it to someone else.
The preview screen also lets you crop the page before you save it. Drag the crop handles at the corners and edges to cut off a header, a footer, or an advert you do not need. Cropping now saves you from editing the PDF later, so take a few seconds to frame the page properly.
One thing to remember is that a full-page capture saves the page as it looks at that moment. Content that loads only when you scroll, such as videos that start playing or images that appear late, may not be included. If a page looks incomplete in the preview, scroll through it once first so everything loads, then take the screenshot again.
Method 3: Edit, Crop, Mark Up and Share Your Screenshot
The editing screen that opens when you tap the thumbnail is where a plain screenshot becomes a useful one. You can crop out clutter, draw attention to the important part, add text, and share the finished result without ever leaving the editor. Anything you do here happens before the screenshot is saved.
Take your time with this screen. The thumbnail stays open as long as you need it, so there is no rush. If you make a mistake, the undo arrow at the top lets you step back one change at a time.

Crop and Rotate
Drag any corner or edge of the screenshot to crop it. Pull the edges in to remove the status bar, the home indicator, or empty space around the subject. The crop applies to the whole image, so check the corners before you tap Done.
Tap the crop icon at the top of the screen to open more options. Here you can rotate the image, flip it, or pick a fixed shape such as a square. Rotation is handy when you captured a photo or a document sideways, and a square crop works well for profile pictures and social media posts.
Mark Up with Pens and the Highlighter
The toolbar along the bottom holds the drawing tools. The pen draws a solid line, the marker draws a thicker line, and the pencil draws a fine, light line. Tap a tool twice to change its thickness, and tap the colour circle to pick a colour.
Use the highlighter to draw attention to a line of text or a button, but do not use it to hide private information. The highlighter is partly see-through, so text underneath can still be read if someone looks closely. To hide a name, a number, or an address properly, draw over it with the pen in a solid colour, or place a solid shape over it.
The eraser removes your own marks without touching the screenshot underneath. If you erase too much, tap the undo arrow to bring the mark back. The lasso tool lets you select a mark you have drawn and move it somewhere else on the image.
Add Text, Shapes, Arrows, and a Signature
Tap the plus button at the right end of the toolbar to open the extra tools. Here you will find Text, Signature, Magnifier, and a set of shapes including squares, circles, speech bubbles, and arrows. These are the tools that turn a simple capture into clear instructions.
Tap Text to add a label, then tap the text box to type your words. You can change the font size and colour, and drag the box anywhere on the screenshot. Text labels are ideal for pointing out a button, a price, or a step in a set of instructions.
Arrows and circles are just as useful. Draw a circle around the button someone needs to tap, or an arrow pointing at the setting they need to change. Keep your marks simple and few. One circle and one short label explain more than a page covered in drawings.
The magnifier tool enlarges a small part of the screenshot inside a circle, which is perfect for showing tiny text or a small icon. Drag the magnifier to the right spot, and drag its handle to make the circle bigger or smaller.
Share, Save, or Delete
When your edit is finished, tap Done in the top-left corner. For a normal screenshot, you will be asked whether to save it to Photos or delete it. Tap Save to Photos to keep it, or Delete Screenshot if you only needed a quick look.
To share the screenshot instead, tap the share icon in the top-right corner before tapping Done. The share sheet lets you send it through Messages, Mail, WhatsApp, or AirDrop, print it, or save it somewhere else. AirDrop is the fastest way to send a screenshot to your own Mac or iPad.
If you shared a screenshot and no longer need it, delete it from the editor with the bin icon at the top. Deleting here removes it before it is saved, so it never clutters your Photos library.
How to Save a Screenshot to Files
Photos is the default home for screenshots, but Files is often the better choice. Saving to Files keeps your screenshots out of your photo library, lets you name them clearly, and makes them easy to attach to emails or store in a project folder.
Open the screenshot in the editor by tapping its thumbnail, or open it later from the Photos app and tap the share icon. In the share sheet, scroll down and tap Save to Files. Choose a location such as iCloud Drive or On My iPhone, pick or create a folder, and tap Save.
For a full-page screenshot, the process is the same, except the file is a PDF. Tap Done, then Save PDF to Files, and choose your folder. Give the file a clear name while you are there, such as “Receipt March” or “Recipe Chicken Soup,” so you can find it with a search later.
Files saved to iCloud Drive sync to your other Apple devices automatically. That means a screenshot you save on your iPhone 15 can be opened on your Mac or iPad a minute later. You can also rename, move, or tag files in the Files app whenever you like.
Finding Your Screenshots in the Photos App
Screenshots can pile up fast, and scrolling through your whole library to find one is a waste of time. The Photos app keeps them in their own album, so you can find every capture in one place.
Open the Photos app and tap Albums at the bottom. Scroll down to Media Types and tap Screenshots. Every screenshot you have saved is listed there, newest first. From here you can open one, edit it, share it, or delete the ones you no longer need.
You can also use the search tab in the Photos app. Type “screenshots” and the app will show you the matching album and recent captures. If you remember roughly when you took a screenshot, scroll through the Library view by date instead.

Old screenshots are worth clearing out now and then. Open the Screenshots album, tap Select, tap the ones you do not need, and tap the bin icon. Deleted screenshots sit in Recently Deleted for 30 days, so you can recover one if you change your mind.
To keep important screenshots safe, add them to Favourites by tapping the heart icon. Favourited screenshots appear in the Favourites album, so your boarding pass, your receipt, or your parking spot photo is always one tap away.
Tips for Better Screenshots on iPhone 15
A good screenshot is clear, tidy, and easy to understand at a glance. These small habits make a big difference, especially when you share captures with friends, family, or colleagues.
- Crop before you share. Cut out the status bar, adverts, and empty space so the important part fills the frame.
- Capture photos with the camera, not the screen. A screenshot of a photo is lower quality than the original. For the best results, take the photo properly and see our tips for making your iPhone 15 camera better.
- Use full-page capture for long pages. One PDF beats ten separate screenshots that nobody can follow in the right order.
- Hide private details properly. Cover names, numbers, and addresses with a solid pen stroke or a solid shape, never with the see-through highlighter.
- Add one label, not ten. A single arrow and a short line of text explain a screenshot faster than a drawing on every corner.
- Turn on Do Not Disturb first. A message preview in the middle of a screenshot can share more than you planned.
- Save important captures to Files. Receipts, tickets, and forms are easier to find in a named folder than in a sea of photos.
- Clean up every week. Delete one-off screenshots you no longer need so the Screenshots album stays useful.
When you finish capturing for the day, lock your screen to save battery. Our quick guide to turning off the iPhone 15 screen shows the fastest ways to do it.
Troubleshooting Screenshot Problems
Most screenshot problems have a simple cause. Work through these fixes in order, and your captures should be working again in a minute or two.
The buttons open Siri or the power-off screen. You are holding the buttons down too long. Press the Side button and Volume Up together and release them straight away. A quick press takes the screenshot, while a long press wakes Siri or shows the power slider.
Nothing happens when I press the buttons. Try pressing both buttons at exactly the same time. If one button is pressed slightly before the other, the phone may change the volume or lock the screen instead. If the buttons feel unresponsive, restart your iPhone 15 and try again.
The thumbnail disappears before I can tap it. The thumbnail only stays for a few seconds. If it vanishes, the screenshot is still saved in the Photos app. Open the Screenshots album, tap the newest image, and tap Edit to open the same markup tools.
I cannot see the Full Page option. Full-page capture only works in Safari and a few other apps with long scrollable pages. It does not work in every app, and it does not work on the Home Screen. Open the page in Safari and try again.
My full-page screenshot looks incomplete. Some pages load images and videos only as you scroll. Scroll slowly through the whole page once so everything loads, return to the top, and take the screenshot again.
I cannot find my screenshot. Check the Screenshots album under Media Types in the Photos app. If it is not there, check Recently Deleted in case you deleted it by accident. Full-page captures are saved as PDFs in Files, not in Photos.
My storage is full. Screenshots need free space to save. Delete old screenshots, videos, and unused apps, or move files to iCloud. Then try taking the screenshot again.
Frequently Asked Questions
Where do screenshots go on iPhone 15?
Normal screenshots are saved to the Photos app, in the Screenshots album under Media Types. Full-page screenshots are saved as PDFs in the Files app, in the folder you choose when you tap Save PDF to Files.
How do I take a full-page screenshot on iPhone 15?
Open the page in Safari, take a screenshot with the Side button and Volume Up, tap the thumbnail, then tap Full Page at the top. Check the preview, tap Done, and choose Save PDF to Files.
Can I take a full-page screenshot in apps other than Safari?
Sometimes. A few apps with long scrollable content support the Full Page option, but many do not. If the option does not appear after you tap the thumbnail, that app does not support it, and you will need to take several normal screenshots instead.
How do I edit a screenshot after I have saved it?
Open the screenshot in the Photos app and tap Edit. You can crop, rotate, and adjust it there. To use the markup tools, tap the pen icon in the Edit screen, and the same pens, shapes, and text tools will appear.
How do I share a screenshot as a PDF?
Take a full-page screenshot in Safari and save it as a PDF to Files. Then open it in the Files app, tap the share icon, and send it through Mail, Messages, or any other app. You can also print it from the share sheet.
Can I take a screenshot without using the buttons?
Yes. Ask Siri to take a screenshot, or set up Back Tap in Settings, under Accessibility, then Touch, then Back Tap, and assign Screenshot to a double tap or triple tap. You can also add a Screenshot button to AssistiveTouch in Settings, under Accessibility, then Touch, then AssistiveTouch.
Why is my screenshot blurry when I share it?
Some messaging apps compress images when you send them, which lowers the quality. For the sharpest result, share with AirDrop, Mail, or a cloud link instead. Also check that you are sharing the original screenshot and not a screenshot of a screenshot, which loses quality each time.
Conclusion
Screenshots on iPhone 15 are far more powerful than a quick button press. A full-page capture in Safari saves a whole article or receipt in one clean PDF, and the markup tools let you crop, label, and highlight exactly what matters. Saving important captures to Files and finding them in the Screenshots album keeps everything organised.
Start with the button capture, then try a full-page screenshot on a long page you want to keep. Add one circle and one label, save it to the right folder, and you will have a capture that anyone can understand in seconds. Once these steps become habit, you will never lose a useful screen again.