Running out of hard disk space is one of the most common Windows problems. One day everything works fine, and the next day Windows warns you that your drive is almost full, updates refuse to install, and programs start crashing. The fix starts with knowing exactly how much space you have, how much is used, and what is using it.
Windows 11 gives you several ways to check your total hard disk space — from a quick glance in File Explorer to a detailed breakdown in Settings. This guide covers every method, explains what the numbers mean, and shows you what to do when the drive is nearly full.
What “Total Hard Disk Space” Actually Means
These steps work on any Windows 11 PC — if yours still runs Windows 7, update from Windows 7 to Windows 11 first.
Before you check the numbers, it helps to know what you are looking at. Every drive has three key figures:
- Total capacity: the full size of the drive as Windows sees it. A drive sold as 512 GB usually shows around 476 GB in Windows, because manufacturers count a gigabyte as 1,000 megabytes while Windows counts it as 1,024 megabytes. This difference is normal and is not a fault.
- Used space: everything stored on the drive — Windows itself, your programs, documents, photos, videos, temporary files, and the recycle bin.
- Free space: what is left. Windows needs free space to work properly — for updates, virtual memory, and temporary files. As a rule of thumb, keep at least 10 to 15 percent of the drive free, or at least 20 GB on your main drive, whichever is larger.
Most Windows 11 computers have one main drive, usually called Local Disk (C:), where Windows and your programs live. Many also have a second drive (D:, E:) for storage, or an external USB drive. You should check each drive separately, because one can be full while another is nearly empty.
Method 1: Check Disk Space in Settings (Most Detailed)

The Settings app gives you the most complete picture, including a breakdown of what is using the space.
- Click the Start button and open Settings, or press Windows key + I.
- Click System in the left sidebar.
- Click Storage.
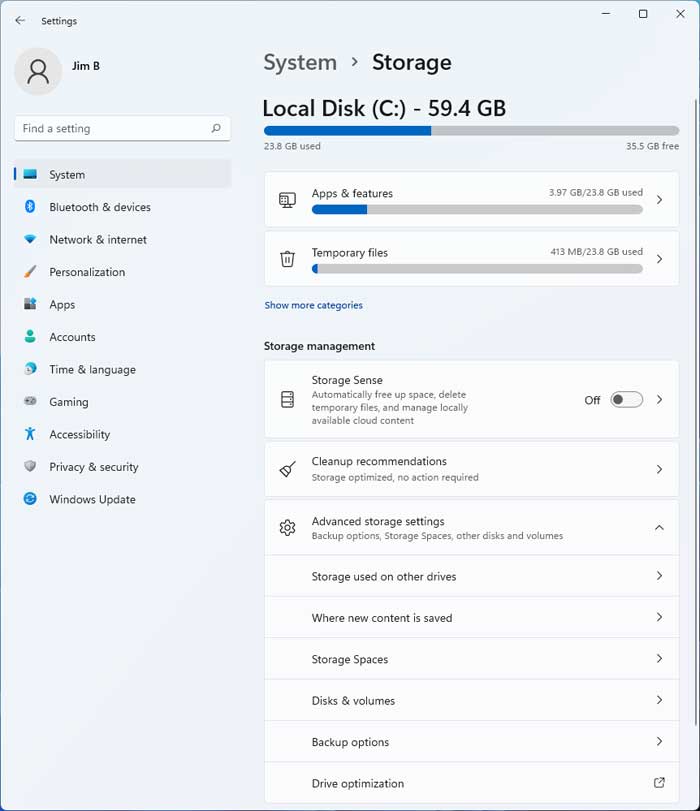
- At the top of the page you will see your main drive listed as Local Disk (C:) with its total size, a colored bar showing how much is used, and the exact figures for used and free space. For example, it might say “476 GB total, 320 GB used, 156 GB free”.
- Below the bar, Windows breaks the used space into categories: Apps & features, Temporary files, Documents, Pictures, Music, Videos, and Other. Click any category to see details and manage it.
- Click Show more categories to see the full list, including Desktop, OneDrive, and system files.
- To check a different drive, scroll down to Advanced storage settings and click Storage used on other drives. Select the drive you want to inspect.
This is the best method when you want to understand where your space went, not just how much is left. The category breakdown tells you whether apps, temporary files, or your own documents are the problem, so you know what to clean up first.
Method 2: Check Disk Space in File Explorer (Fastest)
File Explorer shows the same information in a simpler form, and it is the quickest way to check all your drives at once.
- Open File Explorer by clicking its icon on the taskbar, or press Windows key + E.
- In the left sidebar, click This PC.
- Under Devices and drives, you will see every drive on your computer. Each drive shows its name, a colored bar, and text like “156 GB free of 476 GB”. A drive that is nearly full shows a red bar instead of a blue one.
- For more detail, right-click any drive and choose Properties. The Properties window shows a pie chart of used and free space, plus the exact numbers in bytes, and tells you the file system (usually NTFS) and how much space is used by the drive’s own system files.
This method takes about five seconds and is the one most people use day to day. If you only need to know whether you have room for a large download or a game, this is all you need.
Method 3: Check Disk Space with Disk Management
Disk Management shows every drive and partition on your computer, including ones that File Explorer hides, such as the recovery partition and the EFI system partition. It is useful when a drive seems to be missing or smaller than it should be.
- Right-click the Start button and choose Disk Management. You can also press Windows key + X and select it from the menu.
- The top pane lists each volume with its layout, type, file system, status, capacity, free space, and the percentage free.
- The bottom pane shows a graphical view of each physical disk and its partitions, including unallocated space that is not assigned to any drive letter. Unallocated space is capacity you own but cannot use until you create a volume on it.
- Right-click any volume and choose Properties for the same pie chart and numbers you see in File Explorer.
Disk Management is also where you go to fix space problems at the partition level — extending a volume into unallocated space, shrinking a volume to make room, or assigning a drive letter to a disk that has none. Be careful here: deleting or formatting a partition destroys the data on it, so do not change anything unless you have a backup.
Method 4: Check Disk Space with Command Prompt or PowerShell
If you prefer the command line, or you need to check disk space on a remote computer, these commands do the job in seconds.
Command Prompt: Open Command Prompt and type wmic logicaldisk get size,freespace,caption and press Enter. You will get a table of every drive letter with its total size and free space in bytes. To see the numbers in gigabytes, divide by 1,073,741,824. A simpler option is fsutil volume diskfree C:, which reports the total and free space for the C: drive in bytes.
PowerShell: Open PowerShell and type Get-PSDrive -PSProvider FileSystem. This lists each drive with its used and free space in a readable format. For a single drive, type Get-Volume -DriveLetter C, which shows the health status, file system, size, and free space of that drive in one neat table.
The command line is the best choice for scripts and for checking many computers at once, but for everyday use the graphical methods are easier to read.
Method 5: Check Disk Space with System Information
The System Information tool lists detailed information about your hardware, including storage.
- Press Windows key + R, type msinfo32, and press Enter.
- In the left pane, expand Components, then expand Storage, and click Drives.
- The right pane lists every drive with its model, size, partitions, and total space.
This method is slower than the others and the numbers are shown in raw bytes, so it is mostly useful when you need the drive model and serial details alongside the capacity — for example, when you are checking whether a drive is the one you think it is before replacing it.
Understanding What Is Taking Up Space
A full drive is not the only cause of a slow PC — low memory can make it feel worse, so it is also worth learning how to check your RAM type.
Once you know how much space is used, the next question is what is using it. Here are the usual suspects, from largest to smallest on a typical computer:
- Apps and games: Modern games can take 50 to 150 GB each, and professional apps such as video editors are often several gigabytes. Check Settings, System, Storage, then Apps & features, and sort by size to find the biggest ones.
- Temporary files: Windows Update files, the recycle bin, temporary internet files, and delivery optimization files can quietly grow to tens of gigabytes. Settings, System, Storage, then Temporary files lets you see and delete them safely.
- Your own files: Videos are the biggest by far — one hour of 4K video can be 20 GB or more. Photos, music, and downloads add up over time.
- System files: Windows itself takes around 20 to 30 GB, plus the page file (virtual memory) and the hibernation file (hiberfil.sys), which can each be several gigabytes depending on your RAM.
- OneDrive and cloud files: Files marked “Always keep on this device” take local space. Files marked “Free up space” stay in the cloud and use almost no local space until you open them.
- System Restore points: Windows keeps restore points so you can undo a bad update or driver. Each point can be several gigabytes, and Windows keeps several of them by default.
If the numbers do not add up — the categories in Settings total much less than the used space — the difference is usually the page file, the hibernation file, and hidden system folders. These are normal and should not be deleted by hand.
How to Free Up Space When the Drive Is Nearly Full
If freeing space does not fix the slowness, you can reset Windows 11 without losing data to give the system a clean start.
If your free space is low, work through these steps in order. Most people recover tens of gigabytes with the first three alone.
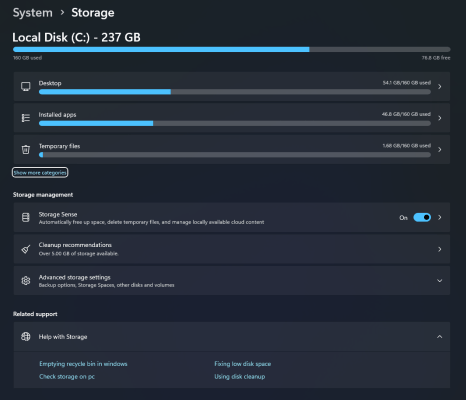
- Run Storage Sense. Go to Settings, System, Storage, and turn on Storage Sense. Click it to configure it — set it to run automatically, delete temporary files, and empty the recycle bin after 30 days. Then click Run Storage Sense now for an immediate cleanup.
- Delete temporary files. In the same Storage page, click Temporary files, wait for Windows to scan, tick the boxes for the file types you want to remove (Temporary files, Recycle Bin, Delivery Optimization Files, Windows Update Cleanup), and click Remove files. Do not tick “Downloads” unless you are sure you do not need anything in that folder.
- Uninstall apps you do not use. Go to Settings, Apps, then Installed apps, sort by size, and uninstall the biggest apps you no longer need. Games you finished are the best candidates.
- Use Cleanup recommendations. In Settings, System, Storage, click Cleanup recommendations. Windows lists large or unused files, apps you have not opened in a while, and files already synced to OneDrive. Tick what you want to remove and click Clean up.
- Move large files to another drive or the cloud. Videos and photo libraries are the easiest to move. Copy them to a second drive, an external hard drive, or OneDrive, then delete the local copies.
- Reduce the hibernation file. If you never use hibernation, open Command Prompt as administrator and run powercfg /hibernate off. This deletes hiberfil.sys and frees space equal to a large part of your RAM. You can turn it back on later with powercfg /hibernate on.
- Limit System Restore space. Right-click Start, choose System, click System Protection, select your drive, click Configure, and lower the maximum disk space used for restore points. Do not turn it off entirely — restore points have saved many computers from a bad update.
- Run Disk Cleanup for system files. Search for Disk Cleanup in the Start menu, run it as administrator, click Clean up system files, and select categories such as Windows Update Cleanup and Previous Windows installations. The last one can be 20 GB or more after a major update, but only remove it if you are sure you will not roll back.
Troubleshooting: Disk Space Problems
If you are setting up a replacement drive or a new PC, download Windows 11 Pro from Microsoft to install a fresh copy of Windows.
The drive shows less space than it should. First, remember the manufacturer-versus-Windows counting difference — a 1 TB drive shows about 931 GB in Windows. If the gap is bigger than that, check Disk Management for unallocated space or a hidden recovery partition. Some laptop makers also reserve a large recovery partition that you can see in Disk Management.
Free space keeps shrinking on its own. The usual causes are Windows Update downloading files, System Restore creating points, or an app writing large log files. Check Settings, System, Storage, then Temporary files and sort your folders by size in File Explorer. A runaway app log file can grow by gigabytes in a day and is easy to miss.
A drive does not appear at all. Open Disk Management. If the disk is listed as Offline, right-click it and choose Online.
If it has no drive letter, right-click the volume and choose Change Drive Letter and Paths, then assign a letter. If the disk does not appear in Disk Management either, check the cables and the BIOS — the drive may not be detected at the hardware level.
“Low Disk Space” warning keeps appearing. Windows shows this warning when a drive drops below about 10 percent free. Free up space using the steps above, and if the drive is genuinely too small for your needs, consider moving your Documents, Pictures, and Downloads folders to a larger drive: right-click the folder, choose Properties, go to the Location tab, and click Move.
Storage settings show the wrong numbers. The Storage page caches its results. Click the refresh option, or restart the computer and check again. If the numbers are still wrong, run the System File Checker by opening Command Prompt as administrator and typing sfc /scannow — corrupted system files can confuse the storage calculation.
An external drive shows as full when it is not. This often happens with a drive formatted as FAT32, which has a 4 GB limit per file and can report misleading numbers, or with a drive whose recycle bin holds deleted files. Empty the recycle bin while the drive is connected, and consider reformatting the drive to exFAT or NTFS if you regularly store large files on it. Formatting erases everything, so back up first.
Frequently Asked Questions
How much free space should I keep on my C: drive?
Aim for at least 10 to 15 percent free, or 20 GB at minimum. Windows Update needs several gigabytes of free space to download and install updates, and Windows uses free space for virtual memory. Below about 5 GB free, you will start seeing errors and slowdowns.
Why does a 512 GB drive only show 476 GB?
Drive makers count a gigabyte as 1,000 megabytes, while Windows counts it as 1,024 megabytes. The drive is not faulty and no space is missing — the two sides simply use different definitions. On top of that, a small recovery partition takes a few gigabytes that Windows does not count in the main drive total.
Is it safe to delete temporary files?
Yes, the ones Windows lists under Settings, System, Storage, then Temporary files are safe to delete. Windows only offers files it can recreate or does not need. The one exception is the Downloads folder, which Windows lists there as an option — only tick it if you are sure you do not need anything in Downloads.
Can I check disk space from the taskbar?
Not directly, but you can pin File Explorer to the taskbar and open This PC in one click, which shows all your drives and their free space. Third-party widgets and Rainmeter skins can also show live disk usage on the desktop.
What is the difference between Disk Cleanup and Storage Sense?
Disk Cleanup is the older manual tool — you run it when you want. Storage Sense is the newer automatic version built into Settings: once turned on, it cleans temporary files and the recycle bin on a schedule you choose, without you having to remember.
Should I defragment my drive to free space?
Defragmentation does not free space; it reorganizes files so the drive reads them faster. On a traditional hard disk drive it can help performance slightly. On an SSD, never defragment — Windows handles SSDs with the TRIM command instead, and defragmenting an SSD wears it out for no benefit.
How do I check disk space on a second hard drive or USB drive?
The same methods work for any drive. In File Explorer, open This PC and look at the drive under Devices and drives. In Settings, go to System, Storage, then Advanced storage settings, then Storage used on other drives, and pick the drive from the list.
Conclusion
Checking your total hard disk space in Windows 11 takes seconds: File Explorer’s This PC page shows every drive at a glance, and Settings, System, then Storage gives you the full breakdown of what is using the space. Make it a habit to check once a month, keep at least 10 to 15 percent free, and let Storage Sense handle the routine cleanup. When the drive does fill up, temporary files, unused apps, and large videos are almost always where the space went — and now you know exactly where to look.