
BitLocker is Windows 11’s built-in drive encryption, and it is one of the strongest privacy tools already sitting on your computer. When BitLocker is turned on, everything on your drive is scrambled with strong encryption, so if your laptop is stolen or your hard drive is removed, nobody can read your files without your password or recovery key. This guide explains exactly what BitLocker is, which versions of Windows 11 include it, how to turn it on for your system drive, USB drives, and extra data drives, how to back up your recovery key, and how to fix it when something goes wrong. BitLocker is only included with the Pro edition — if you do not have it yet, see how to download Windows 11 Pro.
What Is BitLocker and Why Should You Use It?
BitLocker encrypts an entire drive — every file, every folder, and even the free space — using the AES encryption standard with a 128-bit or 256-bit key. Once encryption is active, the data on the drive is unreadable without the correct key, even if someone removes the drive and plugs it into another computer. On a laptop, this matters enormously: laptops get lost and stolen, and an unencrypted drive hands your documents, photos, passwords, and work files to whoever finds it.
BitLocker protects you silently in the background once it is set up. There is no noticeable slowdown on modern computers, because the encryption is handled efficiently by your processor, and on newer devices with hardware encryption support it is almost completely free.
BitLocker works together with the TPM chip in your computer. The TPM (Trusted Platform Module) is a small security chip on the motherboard that stores the encryption keys safely and checks that the startup process has not been tampered with before unlocking the drive. When Windows starts normally, the TPM releases the key automatically and you notice nothing at all.
If someone tries to boot from a different drive or tampers with the startup files, the TPM refuses to release the key and Windows asks for the recovery key instead. That combination — automatic convenience plus a strong fallback — is what makes BitLocker practical for everyday use.
BitLocker vs Device Encryption: What Is on Your PC?
Windows 11 has two related features, and the name you see depends on your edition. BitLocker Drive Encryption is the full feature, and it is included with Windows 11 Pro, Enterprise, and Education. If you have Windows 11 Home, you will not see BitLocker in the Control Panel; instead, Home includes a simpler feature called Device Encryption, which does the same basic job — it encrypts the whole drive automatically on supported devices, but it offers fewer management options and no BitLocker To Go for USB drives.
To find out what you have, open Settings, go to Privacy and security, then Device encryption. If Device Encryption is listed and switched on, your drive is already encrypted. If you have Windows 11 Pro, open the Control Panel, go to System and Security, then BitLocker Drive Encryption, and you will see the full BitLocker panel with the status of every drive.
To check your edition, open Settings, go to System, then About, and look at the Edition line. If you are on Home and you want full BitLocker, you can upgrade to Pro through Settings, then System, then Activation, either by buying a Pro licence from the Microsoft Store or by entering a Pro product key.
Before You Turn On BitLocker: Requirements and Preparation
Check these items before you begin. First, confirm your edition is Pro, Enterprise, or Education — BitLocker’s full controls are not available on Home. Second, check that your PC has a TPM chip.
Press the Windows key + R, type tpm.msc, and press Enter. The TPM Management window tells you whether a TPM is present and which version it is. TPM 2.0 is ideal, but TPM 1.2 also works.
If your PC has no TPM, you can still use BitLocker, but you need to change a Group Policy setting to allow a startup password or USB key instead — this is covered in the troubleshooting section below. If you are still on an older version of Windows, follow our guide to update from Windows 7 to Windows 11 first.
Third, make sure you have administrator rights on the PC, because only an administrator can turn BitLocker on. Fourth, plug a laptop into mains power — encryption of a large drive can take a while, and you do not want the battery to die halfway through. Fifth, and most important, plan where you will store your recovery key.
The recovery key is a 48-digit number that is the only way back into your drive if Windows ever asks for it — after a hardware change, a BIOS update, or a forgotten PIN. Save it to your Microsoft account, save it to a USB drive, and print a copy to keep somewhere safe. Never store the only copy of the recovery key on the same drive BitLocker is encrypting.
Method 1: Turn On BitLocker for the System Drive (C:) from the Control Panel
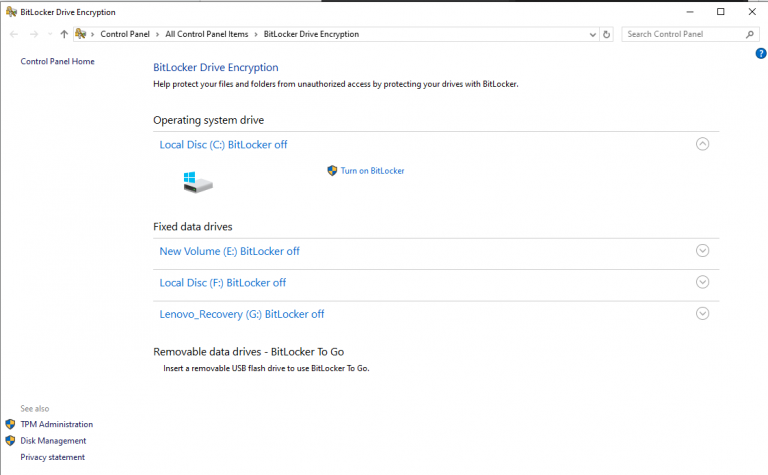
This is the standard method on Windows 11 Pro, and it takes only a few minutes to start.
- Open the Control Panel. The fastest way is to press the Windows key, type “Control Panel”, and press Enter.
- Go to System and Security, then click “BitLocker Drive Encryption”.
- Find your operating system drive (usually C:) under the “Operating system drive” heading. Click “Turn on BitLocker” next to it.
- Windows checks your system and asks how you want to back up your recovery key. Choose at least one option — “Save to your Microsoft account” is the most convenient, because you can retrieve it later from your Microsoft account’s devices page. You can also choose “Save to a USB flash drive” or “Print the recovery key”. Click Next after saving it, and confirm that you have stored it safely.
- Choose how much of the drive to encrypt. “Encrypt used disk space only” is faster and is fine for a new PC or a freshly installed drive. “Encrypt entire drive” is slower but more thorough, and it is the right choice for a PC that has been in use for a while, because it also encrypts deleted files that might still be recoverable. Select your option and click Next.
- Choose the encryption mode. “New encryption mode” is best for fixed drives on this device. “Compatible mode” is only needed if the drive will be moved to an older version of Windows. Select “New encryption mode” and click Next.
- Tick the box “Run BitLocker system check”, then click “Continue”. Your PC will restart, BitLocker will verify that the system is ready, and encryption will begin automatically in the background. You can keep using your PC while it works — encryption of a typical drive takes from a few minutes to a couple of hours depending on its size and speed.

You can watch the progress by opening the BitLocker panel again, or by pressing the Windows key + R, typing manage-bde -status, and pressing Enter in an elevated Command Prompt or PowerShell window.
Method 2: Turn On BitLocker from Settings (Device Encryption)
On many modern Windows 11 Pro laptops, the simplest route is through Settings. Open Settings, go to Privacy and security, then click “Device encryption”. If your device supports it, you will see a single switch.
Turn it on, and Windows encrypts the drive using the TPM, with the recovery key automatically saved to your Microsoft account. This method is quick and clean, but it gives you fewer choices than the Control Panel route — for example, you cannot choose between encrypting used space only or the entire drive.
If you want that control, use Method 1 instead. If the Device encryption page says the feature is unavailable, your hardware does not support it, and the Control Panel method is the way to go.
Method 3: Encrypt a Data Drive or USB Drive with BitLocker To Go
BitLocker is not only for the system drive. You can encrypt any extra internal drive, external hard drive, or USB flash drive, which is ideal for backups and for files you carry around. Before encrypting a large drive, check the total hard disk space in Windows 11 to confirm how much room you have.
- Open the Control Panel, go to System and Security, then BitLocker Drive Encryption.
- Under “Fixed data drives”, find the drive you want to encrypt and click “Turn on BitLocker”. For a USB drive, look under “Removable data drives – BitLocker To Go”.
- Choose how to unlock the drive. For a data drive, you can use a password. For a USB drive, a password is the usual choice; you can also enable auto-unlock on your own PC so it opens automatically there but stays locked everywhere else.
- Back up the recovery key exactly as in Method 1 — save it to your Microsoft account, a file, or a printed copy.
- Choose how much of the drive to encrypt and the encryption mode, then click “Start encrypting”.
- Wait for encryption to finish before removing the drive. A USB drive can take a few minutes to half an hour depending on its size.
Once a USB drive is protected with BitLocker To Go, plugging it into any Windows PC will ask for the password before showing its contents. On a Mac or a Linux machine the drive will not open at all, so keep that in mind if you share files across different systems.
Method 4: Manage BitLocker with Commands (Advanced Users)
For IT administrators and advanced users, the manage-bde command-line tool gives full control. Open Command Prompt or PowerShell as an administrator (right-click the Start button and choose Terminal (Admin)) and use these commands:
- Check status: manage-bde -status — shows every drive, its encryption state, percentage encrypted, and protection status.
- Turn on BitLocker: manage-bde -on C: -RecoveryPassword — encrypts the C: drive and displays the recovery password on screen. Save it immediately.
- Suspend protection: manage-bde -protectors -disable C: — temporarily suspends BitLocker, which you should do before a BIOS update or a hardware change, so Windows does not ask for the recovery key afterwards.
- Resume protection: manage-bde -protectors -enable C:
- Turn off BitLocker: manage-bde -off C: — starts decryption. The drive stays usable during decryption, which can take a while on large drives.
- Back up the recovery key to Active Directory: manage-bde -protectors -adbackup C: -id {your-key-ID} — useful on work computers managed by an IT department.
There are also PowerShell cmdlets such as Enable-BitLocker, Get-BitLockerVolume, and Disable-BitLocker, which do the same jobs and can be scripted across many computers.
How to Use BitLocker Without a TPM Chip
If your PC has no TPM, BitLocker can still work, but Windows needs permission to use a startup password or a USB startup key instead. This requires the Pro edition and the Group Policy Editor, which Home does not include. Press the Windows key + R, type gpedit.msc, and press Enter.
Navigate to Computer Configuration, then Administrative Templates, then Windows Components, then BitLocker Drive Encryption, then Operating System Drives. Double-click “Require additional authentication at startup”, set it to Enabled, and tick “Allow BitLocker without a compatible TPM”. Click OK and close the editor.
Now when you turn on BitLocker, Windows will ask you to choose a startup password or a USB key that must be present every time the computer boots. Keep the USB key safe and separate from the computer, and store your recovery key as usual.
Tips for Living with BitLocker Day to Day
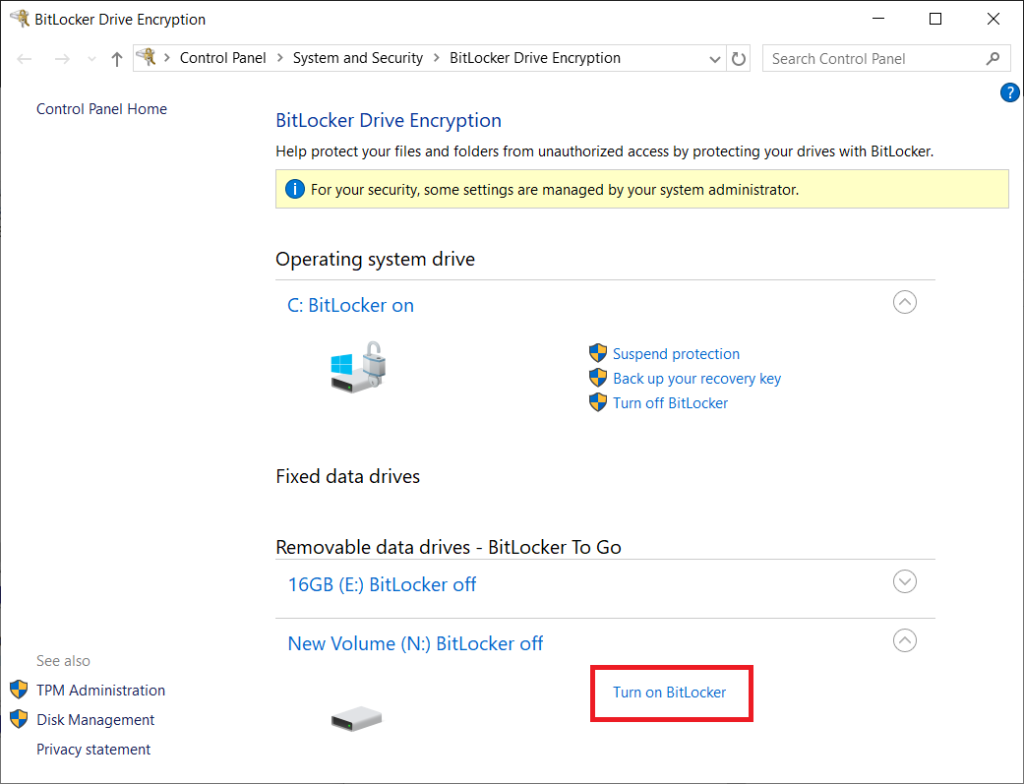
Once BitLocker is on, your daily routine does not change — Windows unlocks the drive automatically at startup on a TPM-equipped PC. A few habits will keep you out of trouble. Always suspend BitLocker before updating your BIOS or firmware, replacing hardware, or changing boot settings; if you forget, Windows will ask for the recovery key at the next startup, which is inconvenient but not dangerous if you have the key saved.
Keep at least two copies of the recovery key in different places — your Microsoft account plus a printed copy is a solid combination. If you use BitLocker To Go on a USB drive, remember the password or keep the recovery key with it, because a forgotten password on an encrypted USB drive means the data is gone for good.
After any major Windows update, glance at the BitLocker panel once to confirm protection is still on. And if you sell or give away your PC, turn BitLocker off first and then use the “Remove everything” reset option, so the next owner starts with a clean, unencrypted drive.
Troubleshooting Common BitLocker Problems
Windows asks for the BitLocker recovery key at every startup. This usually happens after a BIOS update, a hardware change, or a change in boot settings. Enter the 48-digit recovery key once, and Windows should return to normal. If it asks every time, open an elevated Command Prompt and run manage-bde -protectors -disable C: followed by manage-bde -protectors -enable C: to re-seal the TPM, or check whether Secure Boot was turned off in your firmware settings.
“BitLocker could not be enabled” or TPM errors. Open tpm.msc and check whether the TPM is ready for use. If it says the TPM is not ready or is disabled, enable it in your BIOS or UEFI settings, or clear the TPM from the same management window and restart. Make sure you have administrator rights, and check that your drive uses the GPT partition style rather than MBR — BitLocker needs GPT on UEFI systems.
You forgot the BitLocker password for a USB drive. Use the recovery key you saved when you set the drive up. Without the password or the recovery key, there is no way to open the drive — that is the point of encryption, and no Microsoft tool can bypass it.
Encryption is stuck or very slow. Encryption pauses when the computer sleeps, so leave the PC on and plugged in until it finishes. Large mechanical hard drives are much slower than SSDs.
Check progress with manage-bde -status. If encryption appears frozen for many hours, restart the PC and check the status again.
BitLocker is missing from Windows 11 Home. That is expected — Home includes only Device Encryption, found under Settings, then Privacy and security. For the full BitLocker panel, upgrade to Windows 11 Pro through Settings, then System, then Activation. If your Windows installation was damaged during an upgrade, you can reset Windows 11 without losing data.
The recovery key is not in your Microsoft account. Go to account.microsoft.com/devices/recoverykey and sign in with the same Microsoft account used on the PC. If it is not there, the key was saved somewhere else — check USB drives, printed copies, or a file you saved during setup. If no copy exists anywhere, the encrypted data cannot be recovered.
Frequently Asked Questions
Does BitLocker slow down my computer?
On a modern PC with an SSD and a recent processor, the slowdown is negligible and you will not notice it in everyday use. Older PCs with spinning hard drives may see a small impact, mainly during the initial encryption.
Is BitLocker free?
Yes. BitLocker is included at no extra cost with Windows 11 Pro, Enterprise, and Education. There is nothing to buy or subscribe to, and Device Encryption on Home is also free.
Can I turn BitLocker off again?
Yes. Open the BitLocker panel and click “Turn off BitLocker” next to the drive, or run manage-bde -off C: as an administrator. Decryption takes a while on large drives, but you can keep using the PC during the process.
What happens if I lose my recovery key?
If Windows ever demands the recovery key and you cannot find it anywhere, the data on that drive is permanently inaccessible. This is why saving the key in two places — for example, your Microsoft account and a printed copy — is the most important step in this whole guide.
Does BitLocker protect me from viruses?
No. BitLocker protects your data if the drive is stolen or removed. It does not stop malware, phishing, or ransomware while Windows is running. Keep Windows Security or your antivirus active alongside BitLocker.
Can BitLocker encrypt an external hard drive?
Yes. Use BitLocker To Go from the same Control Panel page. The drive will ask for a password on any Windows PC it is plugged into, and it will not open on Mac or Linux systems.
Should I use a PIN with BitLocker?
A TPM plus PIN adds a second factor: even if someone steals your laptop, they need the PIN as well as the hardware. It is a good choice for laptops that hold sensitive work. Set it up through Group Policy or with the command manage-bde -protectors -add C: -TPMAndPIN.
Conclusion
BitLocker is one of the most valuable security features in Windows 11 Pro, and it costs nothing to use. Turn it on for your system drive through the Control Panel, save your recovery key in at least two safe places, and extend the same protection to USB drives with BitLocker To Go. Once it is running, it protects your files silently — and the day your laptop goes missing, you will be very glad it was there.